Use the Attribute mapping FastTab of the PLM system to control how values received from the PLM system are written to D365 F&SCM. The FastTab has two tabs:
Tab | Use it to |
|---|---|
Attribute field mapping | Maps a PLM attribute or a constant value to a field of a D365 F&SCM table. |
Inventory dimension mapping | Maps a PLM attribute or a constant value to an inventory dimension field. |
To open the FastTab, go to Modules > Engineering change management > Setup > PLM integration > PLM systems, select the PLM system, and then expand Attribute mapping.
Note
You must add an attribute on the Attributes FastTab of the PLM system before you can use it on either tab. For more information, see Configure Attributes.
Attribute field mapping
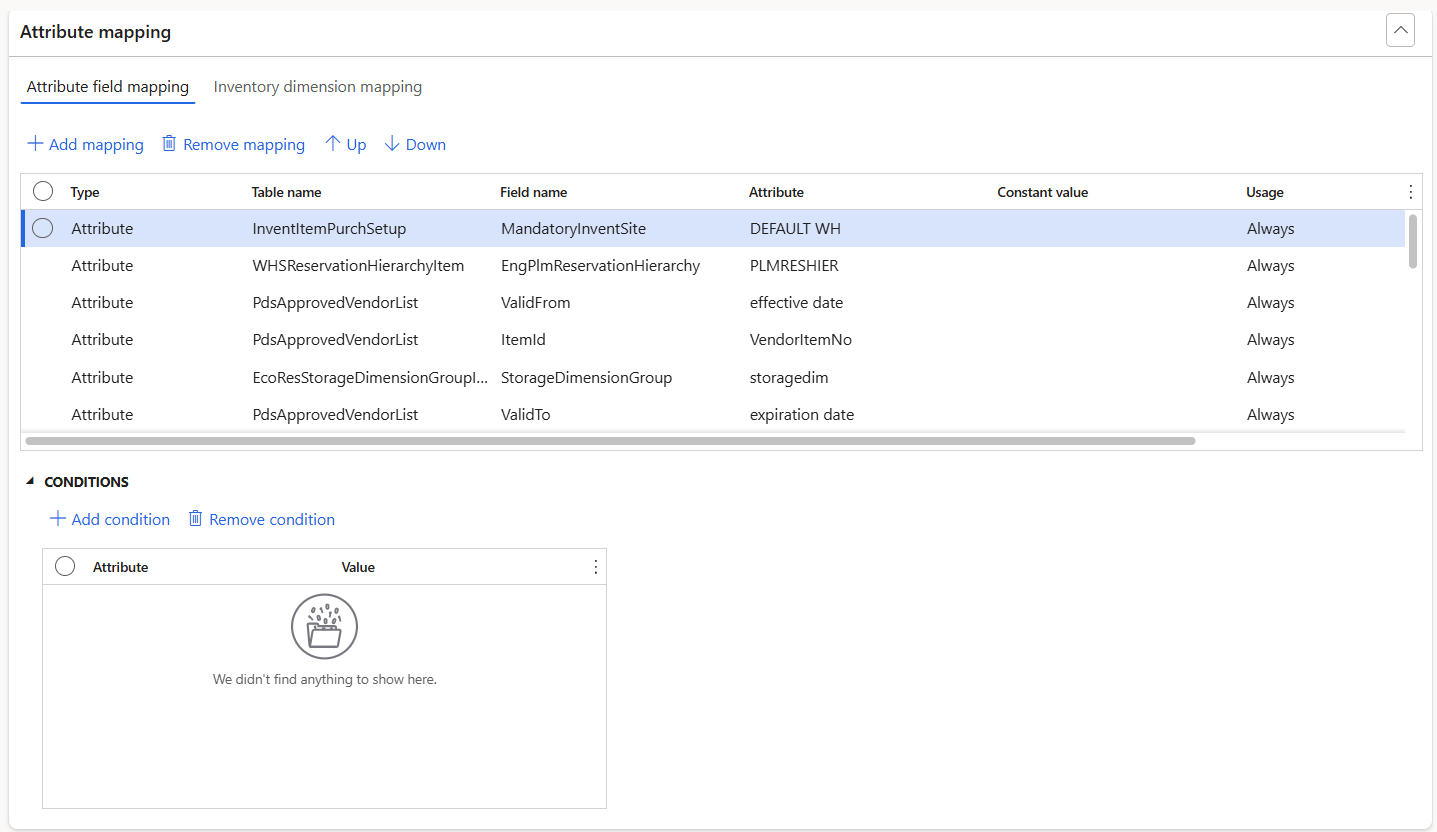
Use this tab to map attribute values received from the PLM system or assign constant values to specific fields in D365 F&SCM.
Field | Purpose |
|---|---|
Type | Defines whether the mapping uses an attribute from PLM or a constant value. |
Table name | Selects the target table in D365 F&SCM. Target tables differ depending on whether the ImportPart, ImportECO, ImportMigration or ImportRelease scenario is used. ECO-related tables start with “EngChgEcm.” |
Field name | Specifies the target field where the value will be written. |
Attribute | Identifies the PLM attribute when Type = Attribute. |
Constant value | Defines the fixed value when Type = Constant. |
Usage | Controls when the mapping is applied.
|
Use condition | Executes mapping only when the defined condition is met. |
Discard empty values | Ignores mappings where the XML field contains no value. |
Note
Attribute values can be up to 1,999 characters, the maximum for a Text-type engineering attribute in D365 F&SCM.
Actions
Action | Description |
|---|---|
Add mapping | Adds a mapping line. |
Remove mapping | Removes the selected mapping line. |
Up / Down | Moves the selected mapping line up or down in the list. |
Condition fields
Per-line conditions can be set up if the mapping needs to be used only under certain conditions. Define them in the Conditions section:
Field | Purpose |
|---|---|
Attribute | Select the attribute. |
Value | Populate the appropriate value (for example, > 10). |
Available target tables for attribute field mapping:
Table Name | Description |
|---|---|
BOM | BOM header table |
BOMTable | BOM lines table |
BOMVersion | BOM version table |
DocuRef | Document reference table |
EcoResStorageDimensionGroup | Links an item to a storage dimension group |
EcoResTrackingDimensionGroup | Links an item to a tracking dimension group |
EngChgEcmHeader | ECO header table |
EngChgEcmProduct | ECO product table |
EngChgEcmProductBOM | ECO BOM header table |
EngChgEcmProductBOMTable | ECO BOM lines table |
EngChgEcmReleasedProductVersion | ECO product version table |
InventItemGroupItem | Links an item to an item group |
InventItemInventSetup | Default order settings – inventory |
InventItemPriceSim | Item price table |
InventItemPurchSetup | Default order settings – purchase |
InventItemSalesSetup | Default order settings – sales |
InventItemSetupSupplyType | Default order settings – header |
InventTable | Released product table |
PdsApprovedVendorList | Approved vendor per item table |
ReqItemTable | Item requirements table |
Route | Route header table |
RouteOpr | Route operation table |
RouteTable | Route lines table |
RouteVersion | Route version table |
WHSPhysDimUOM | Physical dimensions table linked to item |
WHSReservationHierarchyItem | Links an item to a reservation hierarchy |
Note
On this tab, you can map an attribute to an inventory dimension ID field, such as InventDimId on the BOM table or InventDimIdDefault on the InventItemInventSetup table. The value must then be an inventory dimension ID that already exists in D365 F&SCM. To set site, warehouse, version and other dimensions individually, use the Inventory dimension mapping tab instead.
Inventory dimension mapping
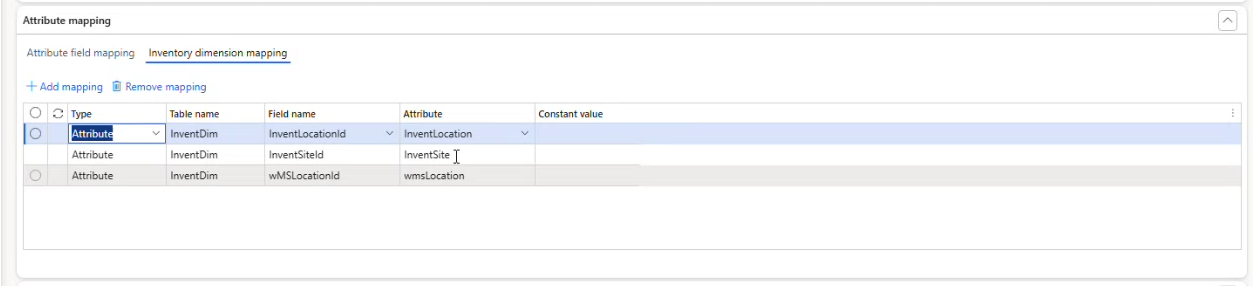
Use this tab to map each inventory dimension, such as site, warehouse, location or version, to a PLM attribute or a constant value. During posting, the integration builds the inventory dimension combination (InventDimId) from these values. It finds the matching combination or creates a new one, so you don't need an existing inventory dimension ID for every combination.
Why use inventory dimension mapping
On the Attribute field mapping tab, you can only pass a complete inventory dimension ID. This works for products without a version dimension, where one site-and-warehouse combination is enough. For products that use Version as a product dimension, each new version needs its own combination of warehouse and version:
The combination often doesn't exist yet in test or new environments.
The combination must be created and re-mapped manually for every new product version.
With inventory dimension mapping, you map the individual dimensions once. The integration then resolves the combination for every product and every new version.
Fields
Field | Purpose |
|---|---|
Type | Defines whether the mapping uses an attribute from the PLM system or a constant value. Select the type from the dropdown, for example Attribute. |
Table name | Selects the target table. Select the table name from the dropdown, for example InventDim. |
Field name | Specifies the inventory dimension field where the value is written. Select the field name from the dropdown, for example InventLocationId.
|
Attribute | Identifies the PLM attribute that holds the value when Type is Attribute. Select the attribute from the dropdown, for example InventLocation. |
Constant value | Defines the fixed value when Type is Constant. |
Actions
Action | Description |
|---|---|
Add mapping | Adds a mapping line. |
Remove mapping | Removes the selected mapping line. |
Map inventory dimensions
Before you start: Add the PLM attributes that carry the dimension values, for example InventSite, InventLocation and wmsLocation, on the Attributes FastTab of the PLM system.
Go to Modules > Engineering change management > Setup > PLM integration > PLM systems.
Select the PLM system.
On the Attribute mapping FastTab, select the Inventory dimension mapping tab.
Select Add mapping.
In the Type field, select Attribute or Constant.
In the Table name field, select the table from the dropdown, for example InventDim.
In the Field name field, select the inventory dimension, for example InventLocationId.
If Type is Attribute, select the PLM attribute in the Attribute field, for example InventLocation. If Type is Constant, enter the value in the Constant value field.
Repeat steps 4 to 8 for each dimension that the integration must set.
Select Save.
Example
Type | Table name | Field name | Attribute |
|---|---|---|---|
Attribute | InventDim | InventSiteId | InventSite |
Attribute | InventDim | InventLocationId | InventLocation |
Attribute | InventDim | wMSLocationId | wmsLocation |
How the mapping is applied
When you post the staging journal, the integration does the following:
It takes the product dimensions on the journal line or BOM line, such as Version, Color, Size, Style and Configuration.
It reads the values of the mapped attributes from the Attributes tab of the journal line or the Attributes sub-tab of the BOM lines tab.
It sets each mapped inventory dimension from the attribute value or constant.
It combines these values into one inventory dimension combination and uses it on the resulting record.
Example: version-controlled product
The product uses the Version product dimension group and the SiteWH storage dimension group. Its default order settings use site 1 and warehouse 11.
On the staging journal line, the BOM site is 1. Two BOM lines send the attribute InventLocation = 12. The other two BOM lines send no warehouse.
After posting, all lines of the BOM have site 1. The two lines with the attribute get warehouse 12. The other lines get warehouse 11.
A line with Color = Red and Version = V1 keeps these values, combined with the mapped site and warehouse.
Note
If a line has no value for a mapped attribute, the integration doesn't set that dimension from the mapping.
Considerations for BOM lines
If the site on a BOM line differs from the BOM site on the BOM header, D365 F&SCM leaves that product out of the BOM lines. This is standard D365 F&SCM behaviour and is independent of inventory dimension mapping.
Keep the site consistent between the BOM header (BOM site on the Details tab of the journal line) and the mapped site on the BOM lines.