After reviewing and completing the data migration setup records with related messages and documents, you can generate tasks based on these records.
Tasks are created based on the areas and sublevels assigned to the data migration setup records as follows:
A root task is created for the record whose area has the lowest level and whose area sublevel is also the lowest.
A task is created beneath the root task for the record with the same area and the next area sublevel. If no such record exists, a task is created for the record whose area is the next level and whose area sublevel is the lowest for that area.
A task is created beneath the previous task for the record with the same area and the next area sublevel. If no such record exists, a task is created for the record whose area is the next level and whose area sublevel is the lowest for that area.
Step 3 is repeated until a task is created for each record.
To each created task, the message is added as defined for the related data migration setup record.
Note
If records exist with the same area and area sublevel, only one task is created based on these records. For all these records, the messages are added to this one task.
When a message is added to a task during task generation, and the related data migration setup record is:
Active, the related message action is set to 'Run'. So, if the task is run, the message is run.
Not active, the related message action is set to 'Skip'. So, if the task is run, the message is not run.
Example
For a data migration project, these data migration setup records are used:
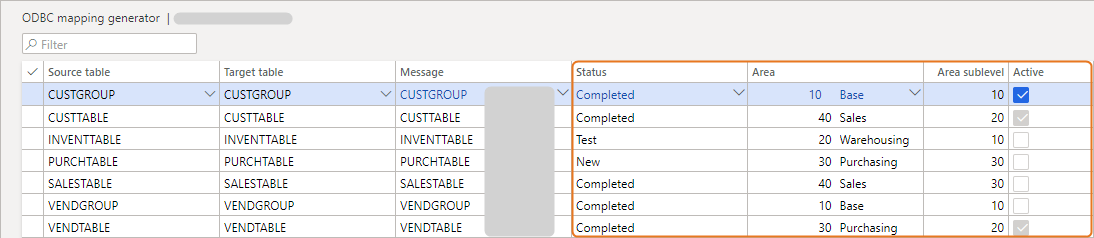
Note the use of status, areas, area sublevels, and record activation.
The generated task structure, as shown on the Project page, is:
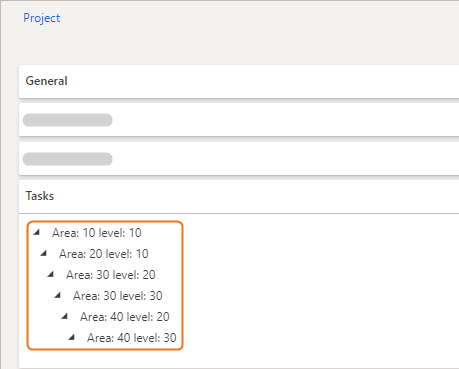
The generated tasks with added messages, and the set message actions are:
Task | Message | Action |
|---|---|---|
Area: 10, level: 10 | CUSTGROUP | Run |
VENDGROUP | Skip | |
Area: 20, level: 10 | INVENTTABLE | Skip |
Area: 30, level: 20 | VENDGROUP | Run |
Area: 30, level: 30 | PURCHTABLE | Skip |
Area: 40, level: 20 | CUSTTABLE | Run |
Area: 40, level: 30 | SALESTABLE | Skip |
Steps
Click Connectivity studio - Integration Design.
Click Projects.
Note
Your currently active project opens. This is the project as shown in the Project field on the Integration design workspace. Make sure your data migration project is selected.
On the Action Pane, click Design.
Click Migrate.
Click Create tasks.
If already tasks exist for the data migration project, these tasks are deleted and new tasks are generated based on the data migration setup.
To confirm, click OK.
Close the page.
Sub-task: Review the generated tasks.
Refresh the Project page.
In the Tasks section, the generated task structure is shown. You can expand and collapse the task structure as desired.
Expand the Tasks section.You can also review the task details.
On the Action Pane, click Design.In the Tasks group, click Tasks.
Close the page.
Close the page.