Install the BIS Azure Relay as Windows service on the external on-premises server.
To install the BIS Azure Relay, first download the BIS Azure Relay and Service Bus.zip file.
Note
Microsoft has replaced Azure Service Bus with Azure Relays.
To install the BIS Azure Relay as a Windows service, Microsoft .NET Framework 4.7.2 or later version is required.
The latest BIS Windows service supports both Azure Relay and Azure Service Bus.
Steps
Open the on-premises server.
Prerequisite for on premises server
Check and confirm DWORD (32-bit) values of your Microsoft\.NETFramework.
On the Windows server running the 'BISAzureServiceBus' service, open this registry path:
HKEY_LOCAL_MACHINE\SOFTWARE\Microsoft\.NETFramework\v4.0.30319Check if these registry values are set as required:
Registry value
Effect
SchUseStrongCrypto = 1
Disables SSL 3.0 and weak ciphers; allows .NET Framework to offer TLS 1.1/1.2 during the handshake instead of being restricted to legacy protocols only.
SystemDefaultTlsVersions = 1
Makes .NET Framework inherit the TLS version list from the Windows OS (Schannel) configuration, instead of its own outdated internal default list.
In 'C:\Program Files\', create a folder named 'BIS Azure Relay'.
Extract the 'BIS Azure Relay and Service Bus.zip' file and copy the files to the 'C:\Program Files\BIS Azure Relay' folder.
.png)
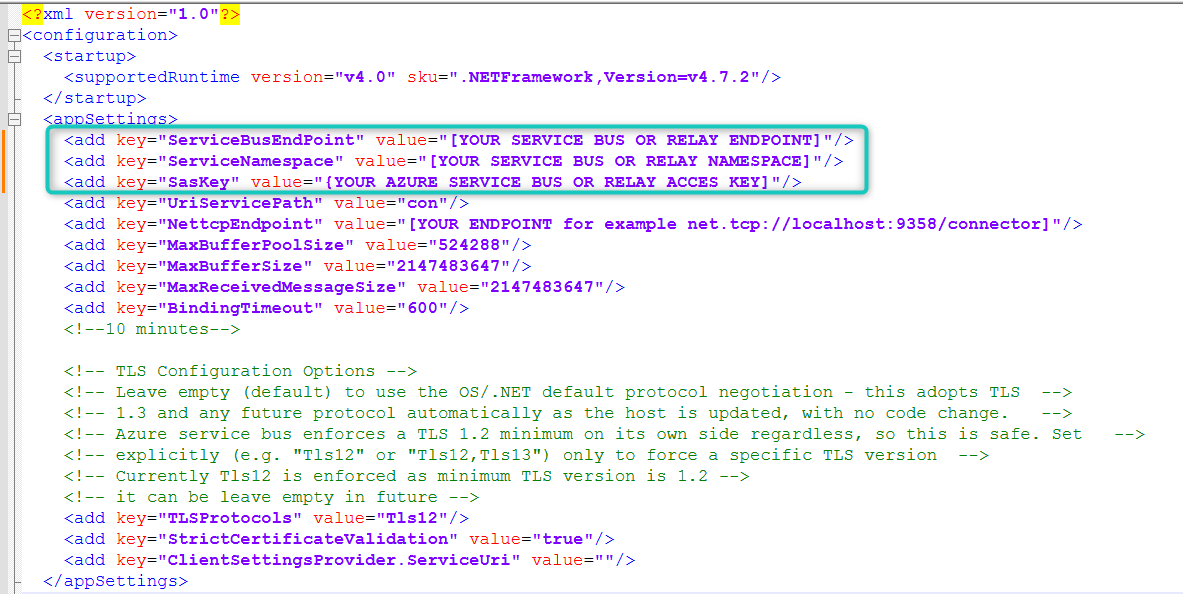
Open the 'BIS.Azure.ServiceBus.WindowsService.exe.config' file with a text editor and in the ‘appSettings’ replace:
[YOUR SERVICE BUS OR RELAY ENDPOINT] with your relay endpoint, for example, “sb://myservicebusname.servicebus.windows.net”
[YOUR SERVICE BUS OR RELAY NAMESPACE] with the primary connection string of the Azure Relay namespace.
Example: Your relay endpoint is: "Endpoint=sb://myservicebusname.servicebus.windows.net". In this endpoint, the primary connection string is "myservicebusname". Use this to replace [YOUR SERVICE BUS OR RELAY NAMESPACE].[YOUR SERVICE BUS OR RELAY ACCESS KEY] with the primary key of the Azure Relay namespace.
To install the BIS Azure Relay Windows service, run the 'installService.cmd' file from the Command Prompt.
Open the installed service in Computer Management.
Open Computer Management, in the navigation pane, click Services, and open 'BISAzureServiceBus'.
Note
‘BisAzureServiceBus’ is the default service name. On installation, you can enter a custom service name. If so, open the custom-named service.
On the Log On tab, fill in a service account with access to the on-premises database and the relevant password.
Click OK
Notes
Errors and warnings for the BIS Azure Relay Windows service are logged in the Event Viewer > Windows Logs > Application event log of the on-premises server.