This walkthrough provides an overview of how to establish an EDI Studio connection between two companies.
Prerequisites
Template | Description | Type | Company |
|---|---|---|---|
TI_EDI_1.PO.OUT | STAEDEAN Template: Export Purchase Order | Outbound | CRONUS Sales |
TI_EDI_2.SO.IN | STAEDEAN Template: Import Sales Order | Inbound | CRONUS International Ltd. |
TI_EDI_3.CONF.OUT | STAEDEAN Template: Export Order Confirmation | Outbound | CRONUS International Ltd. |
TI_EDI_4.CONF.IN | STAEDEAN Template: Import Order Confirmation | Inbound | CRONUS Sales |
TI_EDI_5.SHIP.OUT | STAEDEAN Template: Export Posted Sales Shipment | Outbound | CRONUS International Ltd. |
TI_EDI_6.SHIP.IN | STAEDEAN Template: Import Shipment | Inbound | CRONUS Sales |
TI_EDI_7.INV.OUT | STAEDEAN Template: Export Posted Sales Invoice | Outbound | CRONUS International Ltd. |
TI_EDI_8.INV.IN | STAEDEAN Template: Import Invoice | Inbound | CRONUS Sales |
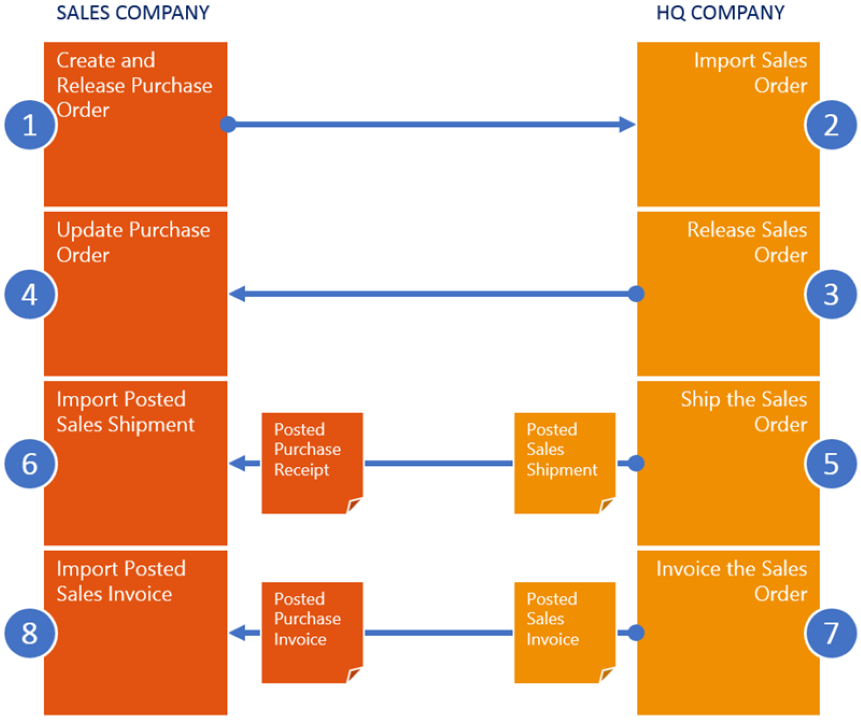
You can create two companies for demonstration purposes. The templates for EDI Studio support an intercompany integration between a Sales Company (CRONUS Sales) and an HQ Company (CRONUS International Ltd.).
Import the EDI Studio configuration packages from the TI.Templates folder in the software package into the respective companies as noted in the overview.
Make sure the user has the necessary read and write permissions to the folder used for the File Writer and File Reader endpoints.
For demonstration purposes, certain custom connectors are available. Import the TI_EDI_Demo.fob objects containing custom codeunits from the Sample.Files folder in the software release package. These objects are NOT part of the standard installation and are strictly for demonstration purposes. For more information on how to create custom connectors, refer to the Software Development Kit (SDK.pdf) in the software release package.
Create a new vendor for the HQ Company.
Create a new customer for the Sales Company.
An EDI Studio contract establishes between these two companies as shown in the image below:
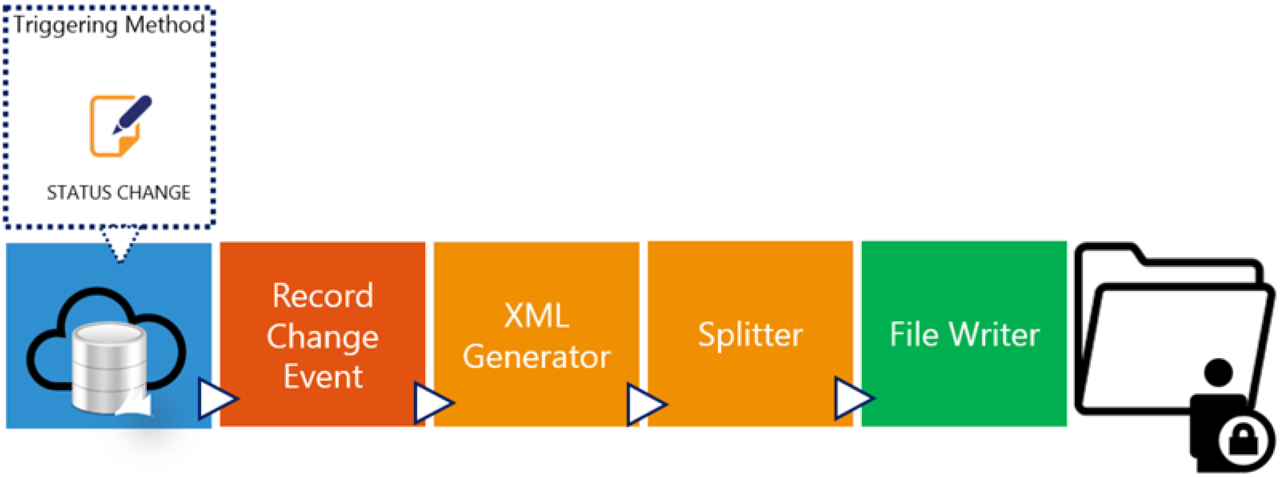
Purchase order export template
Story
This connection uses the following pipeline elements:
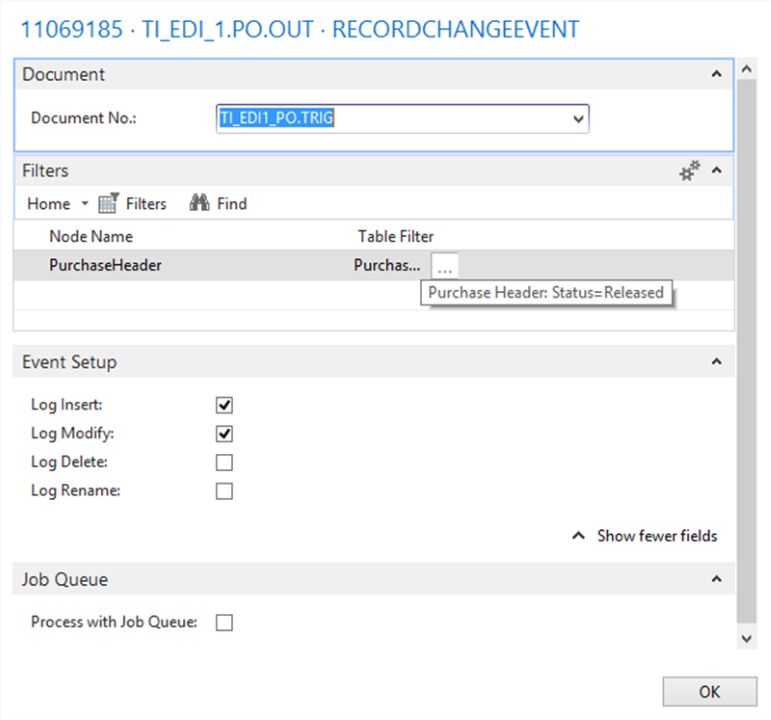
The Record Change Event links to an internal document with only one field: the Status field of the Purchase Header table. The filter sets to Released, so when a purchase order releases, the pipeline triggers.
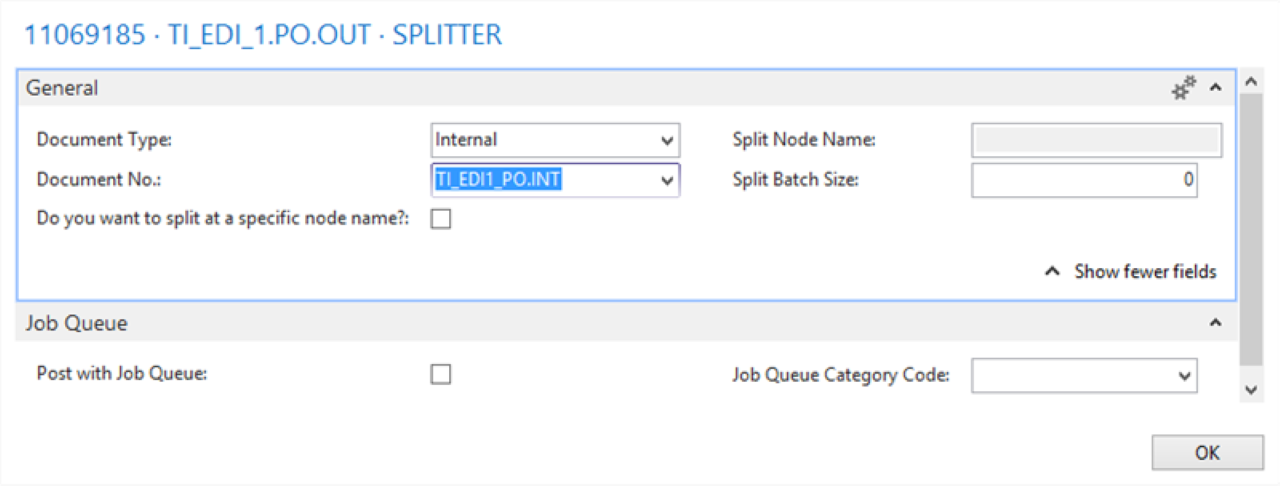
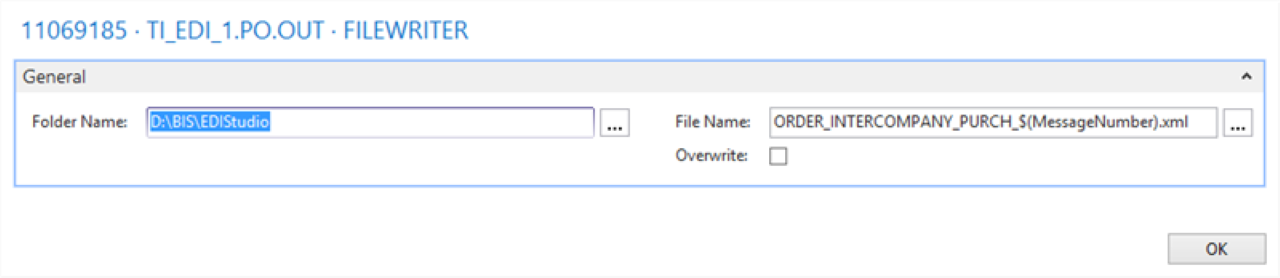
The Splitter activity creates one message for each posted purchase order. The File Writer endpoint exports the XML files.
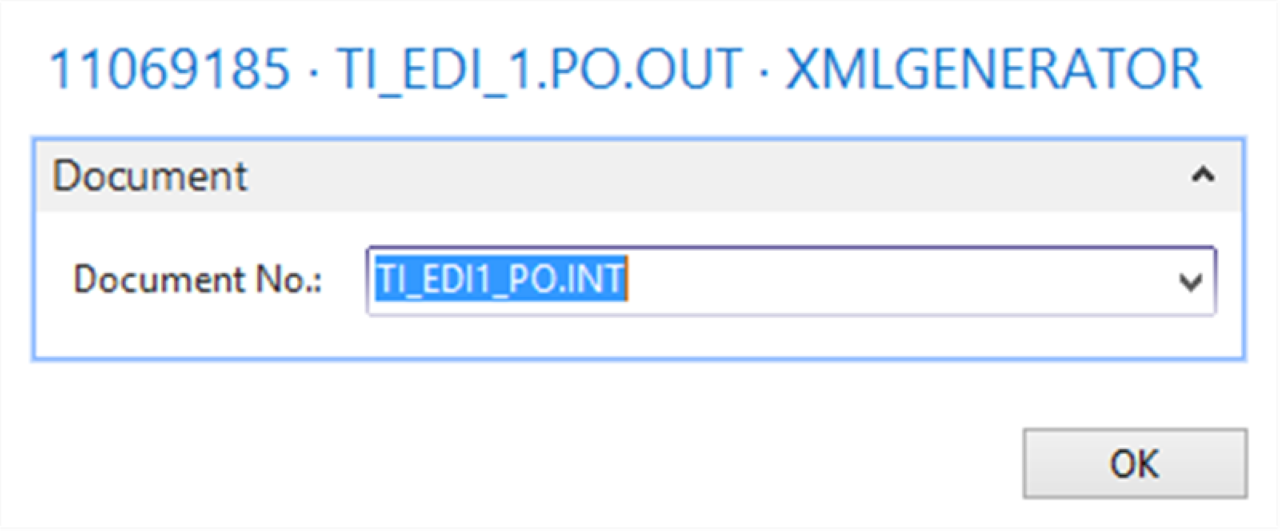
Two documents support this connection: TI_EDI1_PO.TRIG for triggering (the Record Change Event detects modifications based on the table and field structure in this document), and TI_EDI1_PO.INT to generate a filtered set of data for the XML Generator and Splitter.
Setup
Select the CRONUS Sales company.
Import the EDI Studio Connection-TI_EDI_1.PO.OUT.zip configuration package.
Open the TI_EDI_1.PO.OUT connection.
Select Edit on RECORDCHANGEEVENT and specify the required fields.
Select Edit on XMLGENERATOR and specify the required fields.
Select Edit on SPLITTER and specify the required fields.
Select Edit on FILEWRITER and specify the required fields.
Run the Check Configuration action to verify the connection is configured correctly.
Publish the connection (optional for demo). Follow the steps in the wizard to complete the publication.
Refresh or restart the Microsoft Dynamics 365 Business Central client.
Process
Create two new purchase orders, for example, for vendor 10000 London Postmaster and 20000 AR Day Property Management.
Release both purchase orders.
Process the connection.
Result
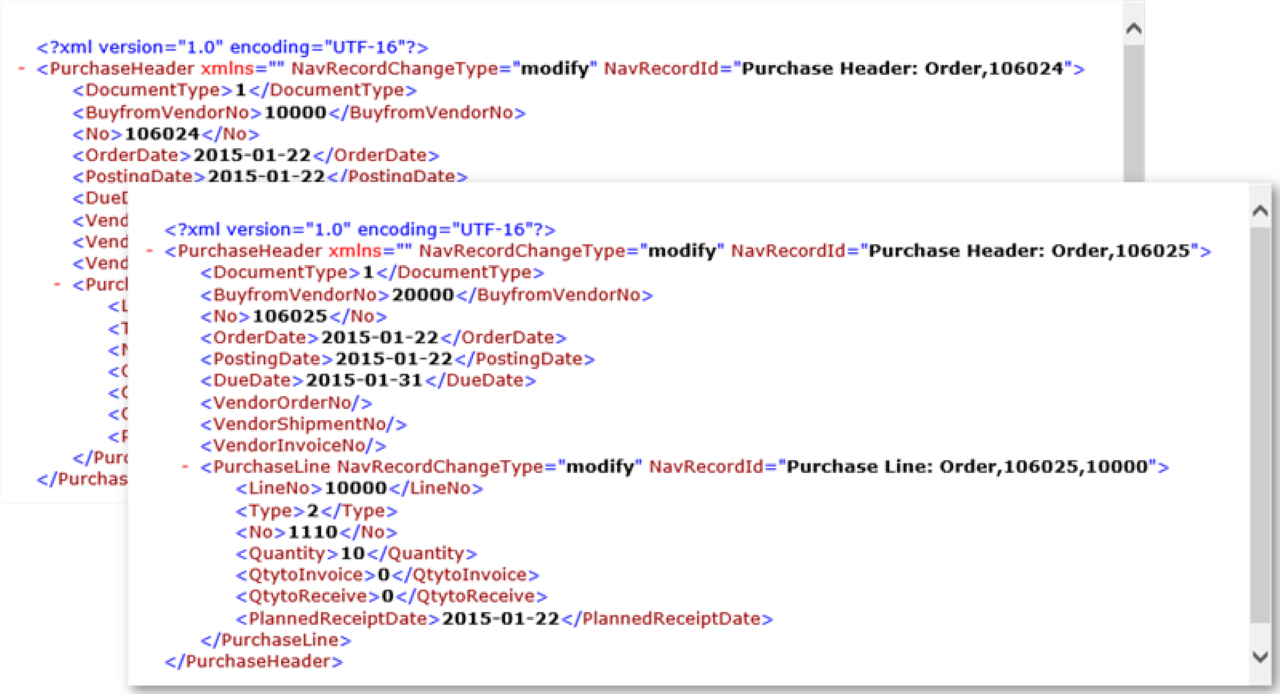
For each released purchase order, an XML file creates and becomes available at the specified location.
Sales order import template
Story
This connection uses the following pipeline elements:
The File Reader endpoint reads the purchase order (in XML format) from the file system.
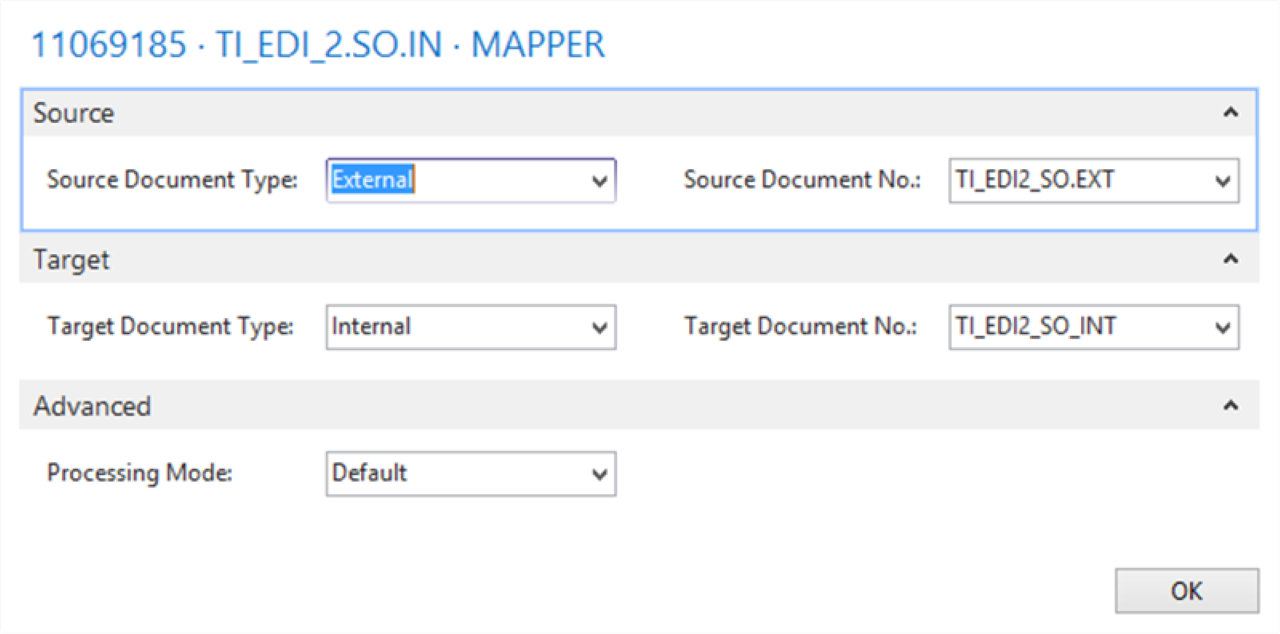
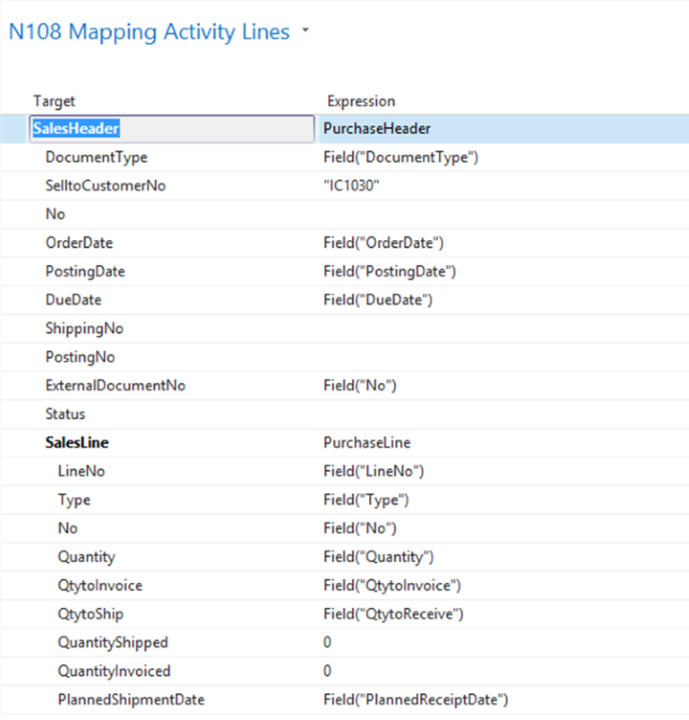
The purchase order XML file does not match the D365 BC table structures for the Sales Header table, so a Mapper activity maps the external (source) document and the internal (target) document.
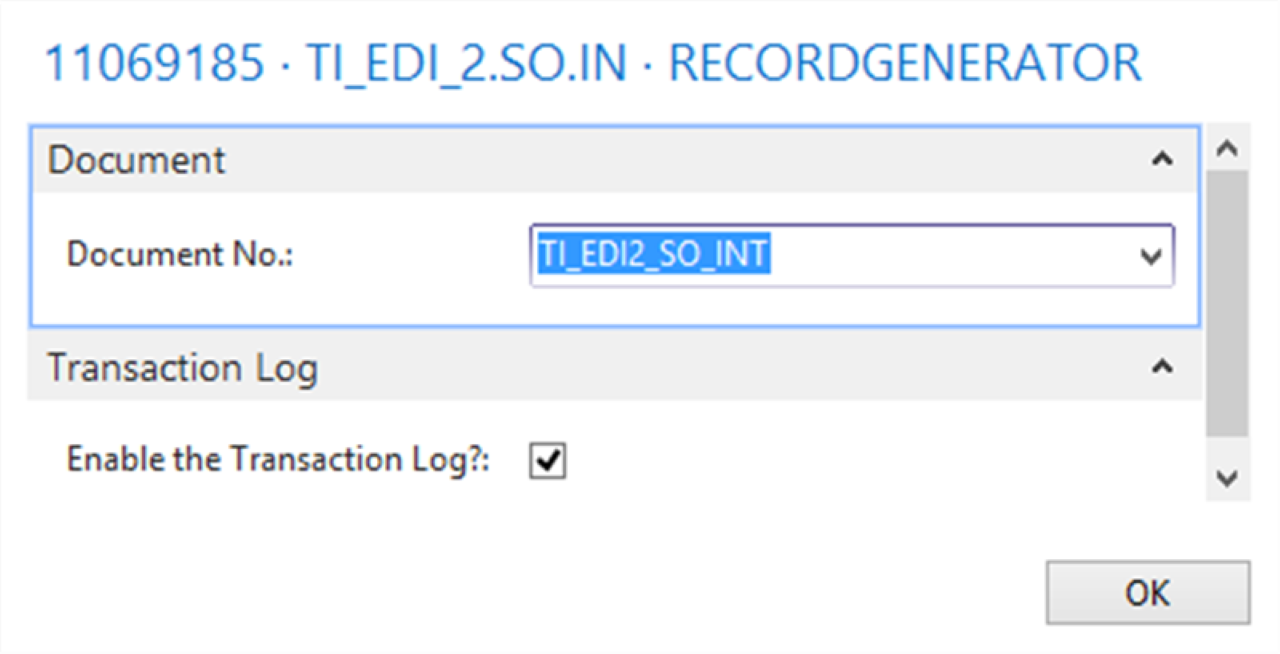
The Record Generator activity creates records and updates the D365 BC tables.
Two documents support this connection: TI_EDI2_SO.EXT (the external document being read) and TI_EDI2_SO_INT (the internal D365 BC table structure specifying how the records store).

Setup
Select the CRONUS International Ltd. company.
Import the EDI Studio Connection-TI_EDI_2.SO.IN.zip configuration package.
Open the TI_EDI_2.SO.IN connection.
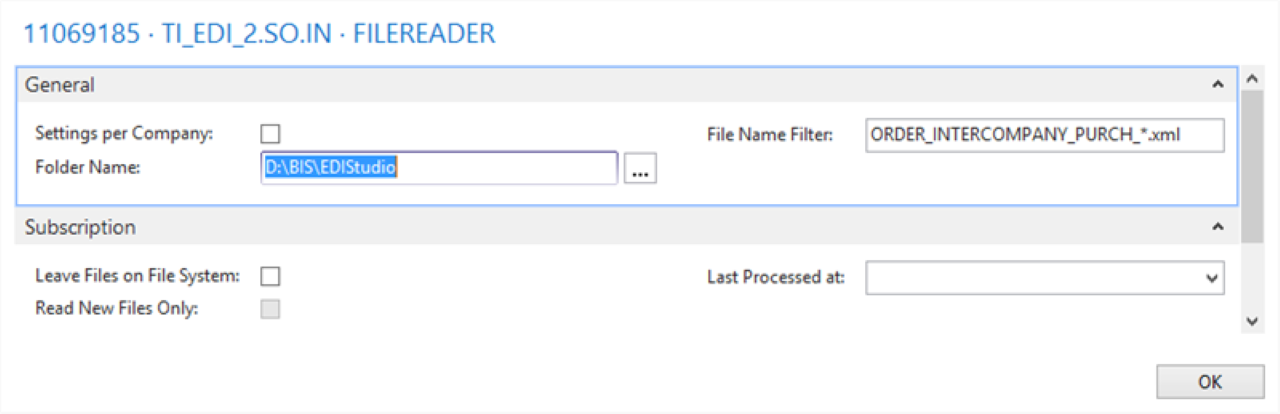
Select Edit on FILEREADER and specify the required fields.
Select Edit on MAPPER and specify the required fields.
Select Edit on RECORDGENERATOR and specify the required fields.
Process
Process the connection.
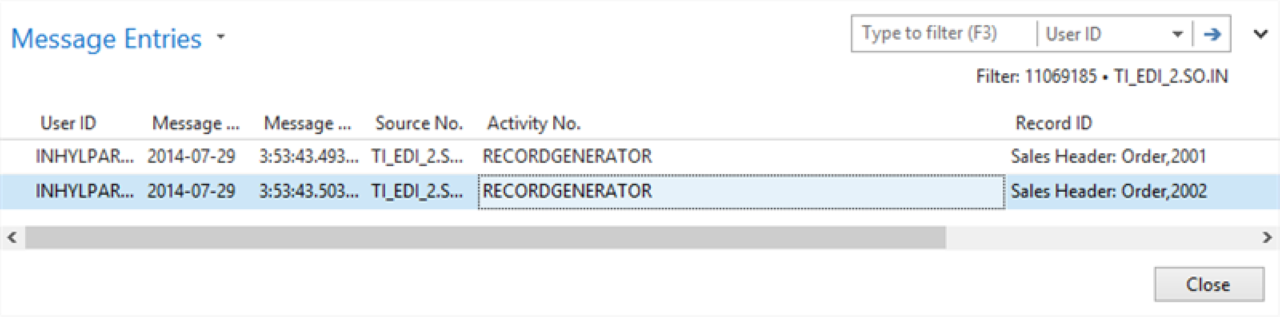
If processing succeeds, check Message Entries for results.
Result
A new sales order creates and becomes available in the Sales Header table. The Message Entries table shows which sales order creates. Use the Transaction Log to see more details for each import.
Order confirmation export template
Story
This connection uses the following pipeline elements:
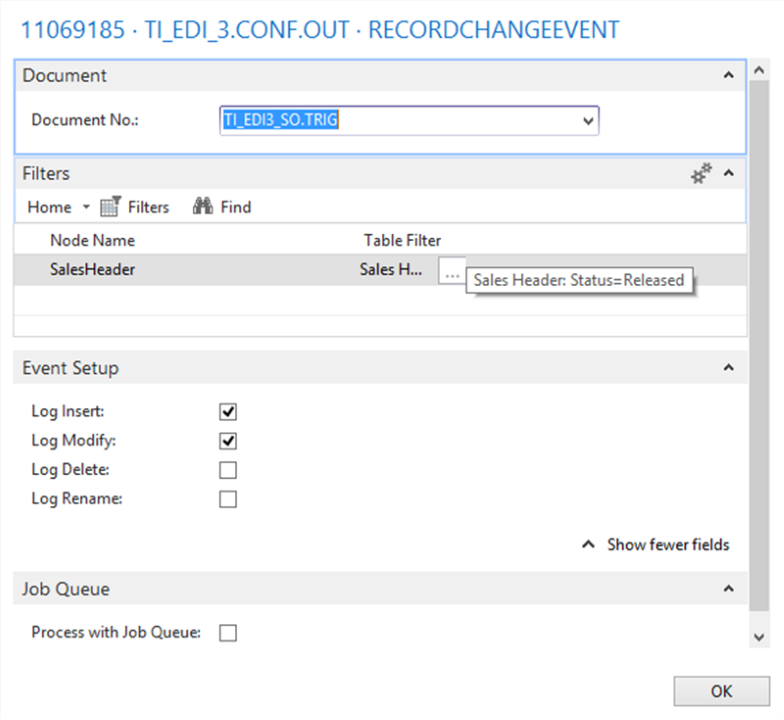
The sales order imports with status Open. When the Sales Manager confirms the planned shipment dates and releases the order, the Record Change Event detects the modification and triggers the pipeline.
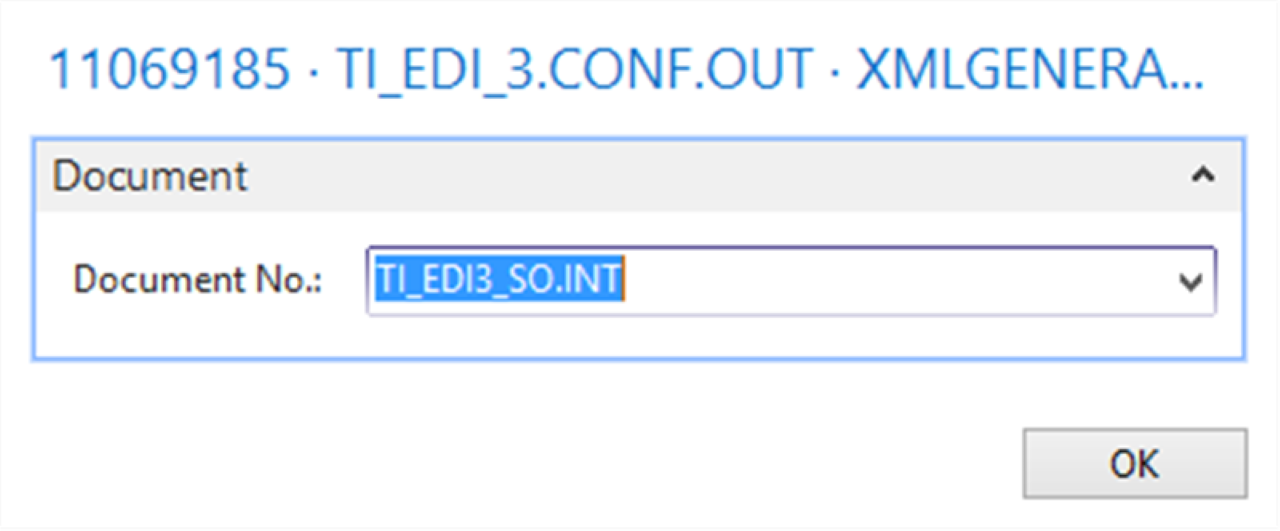
Two documents support this connection: TI_EDI3_SO.TRIG for triggering, and TI_EDI3_SO.INT to generate a filtered set of data for the XML Generator and Splitter.
Setup
Select the CRONUS International Ltd. company.
Import the EDI Studio Connection-TI_EDI_3.CONF.OUT.zip configuration package.
Open the TI_EDI_3.CONF.OUT connection.
Select Edit on RECORDCHANGEEVENT and specify the required fields.
Select Edit on XMLGENERATOR and specify the required fields.
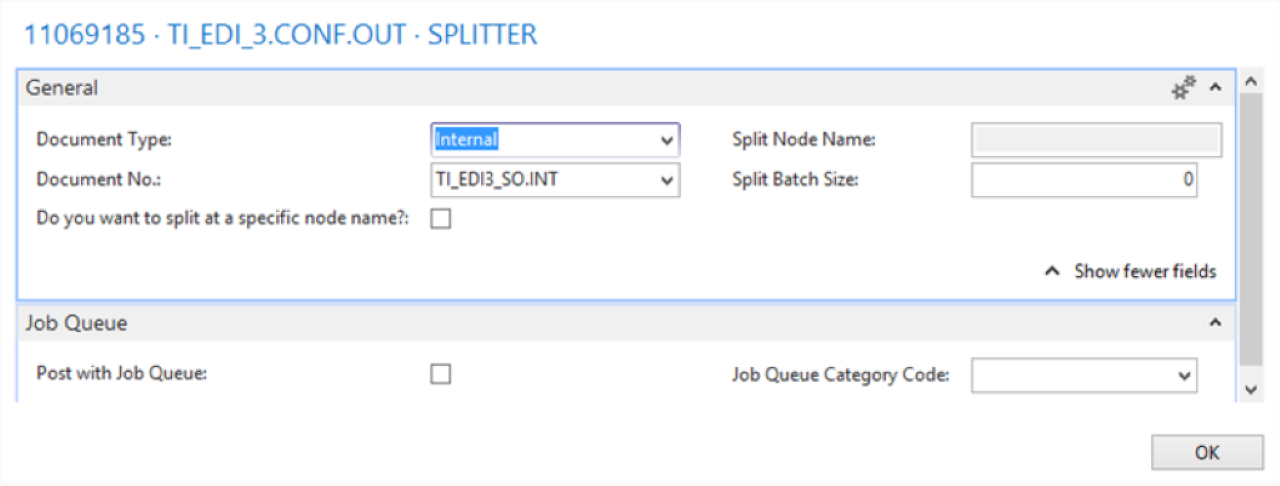
Select Edit on SPLITTER and specify the required fields.
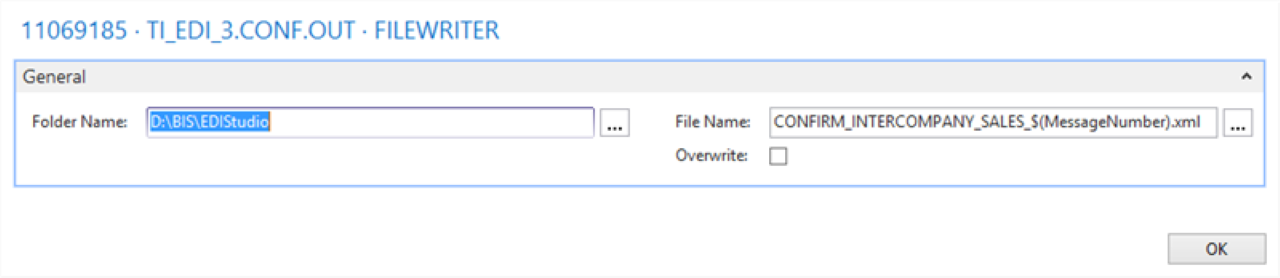
Select Edit on FILEWRITER and specify the required fields.
Run the Check Configuration action to verify the connection is configured correctly.
Publish the connection (optional for demo). Follow the steps in the wizard to complete the publication.
Refresh or restart the Microsoft Dynamics 365 Business Central client.
Process
Release the sales orders imported previously.
Process the connection.
Result
For each released sales order, an XML file creates and becomes available at the specified location.
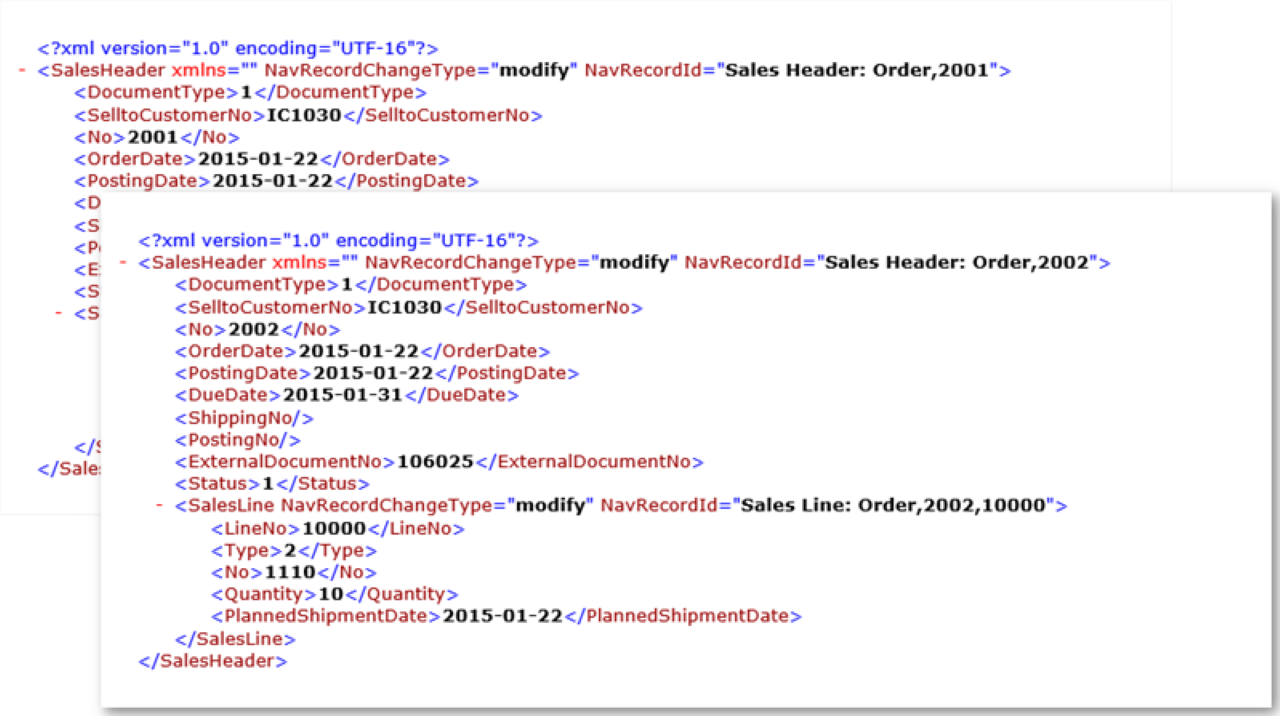
Order confirmation import template
Story
This connection uses the following pipeline elements:
The File Reader endpoint reads the order confirmation (in XML format) from the file system.
The sales order confirmation does not match the D365 BC table structures for the Purchase Header table, so a Mapper activity maps the external (source) document and the internal (target) document.
The Record Generator activity creates records and updates the D365 BC tables. After importing the order confirmation, the External Document No. updates on the Purchase Header.
Two documents support this connection: TI_EDI4_SO.EXT (the external document being read) and TI_EDI4_SO.INT (the internal D365 BC table structure specifying how the records store).
Setup
Select the CRONUS Sales company.
Import the EDI Studio Connection-TI_EDI_4.CONF.IN.zip configuration package.
Open the TI_EDI_4.CONF.IN connection.
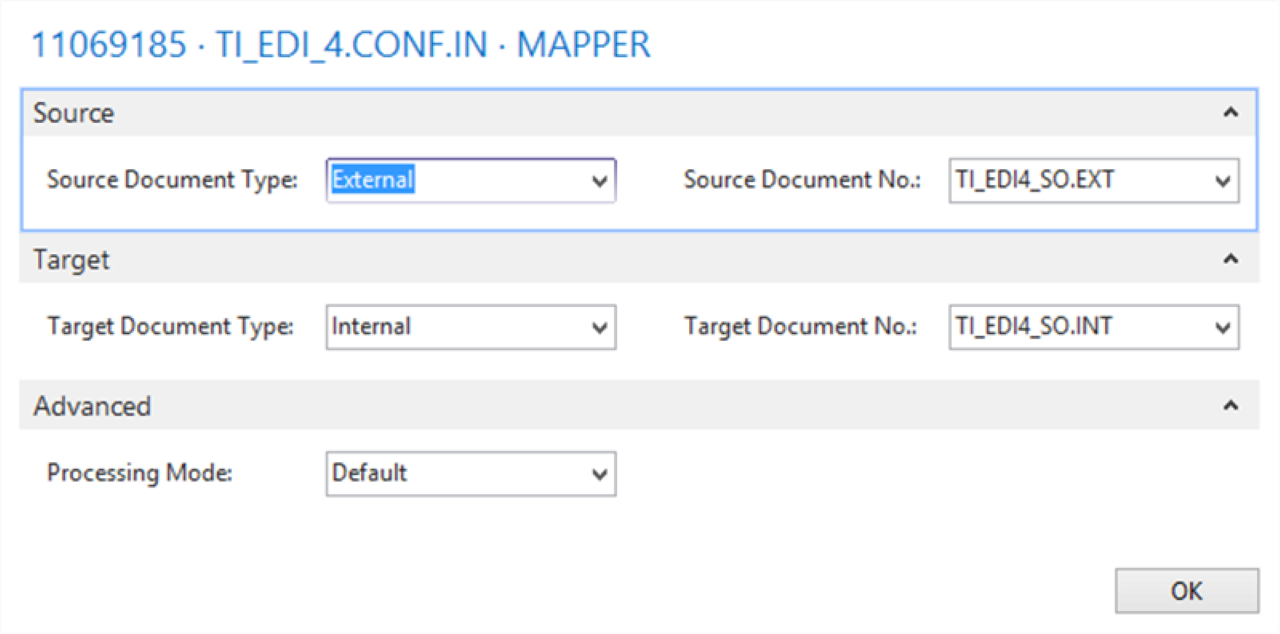
Select Edit on FILEREADER and specify the required fields.

Select Edit on MAPPER and specify the required fields.
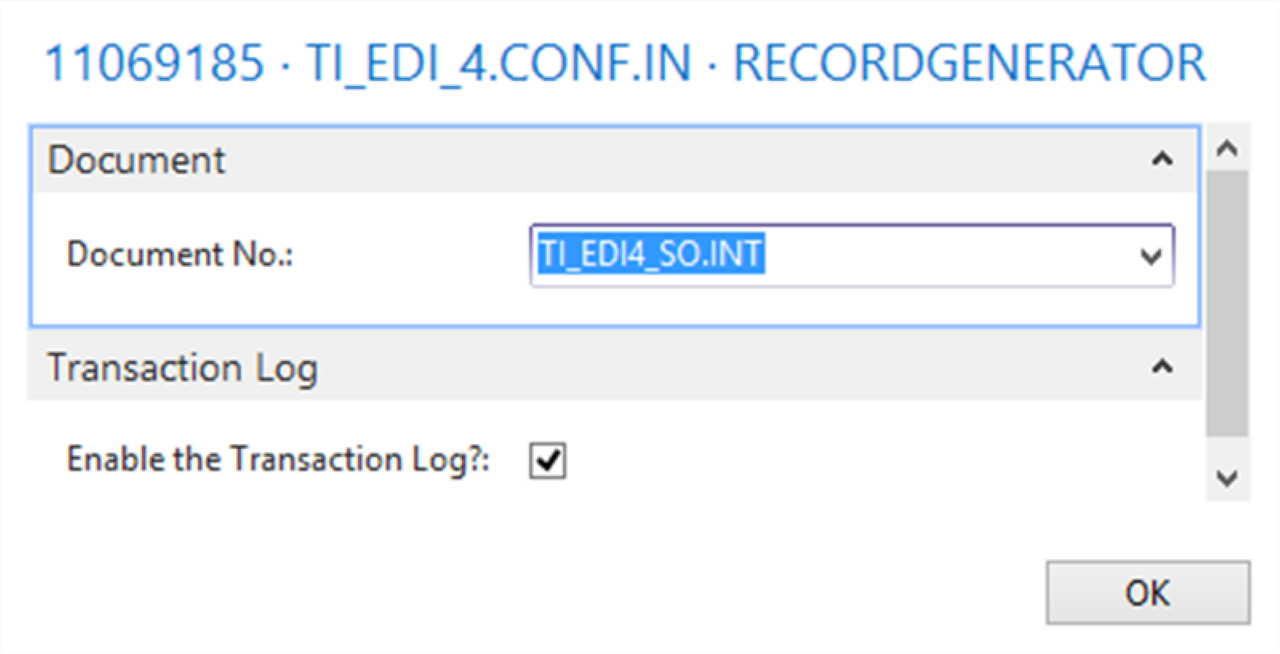
Select Edit on RECORDGENERATOR and specify the required fields.
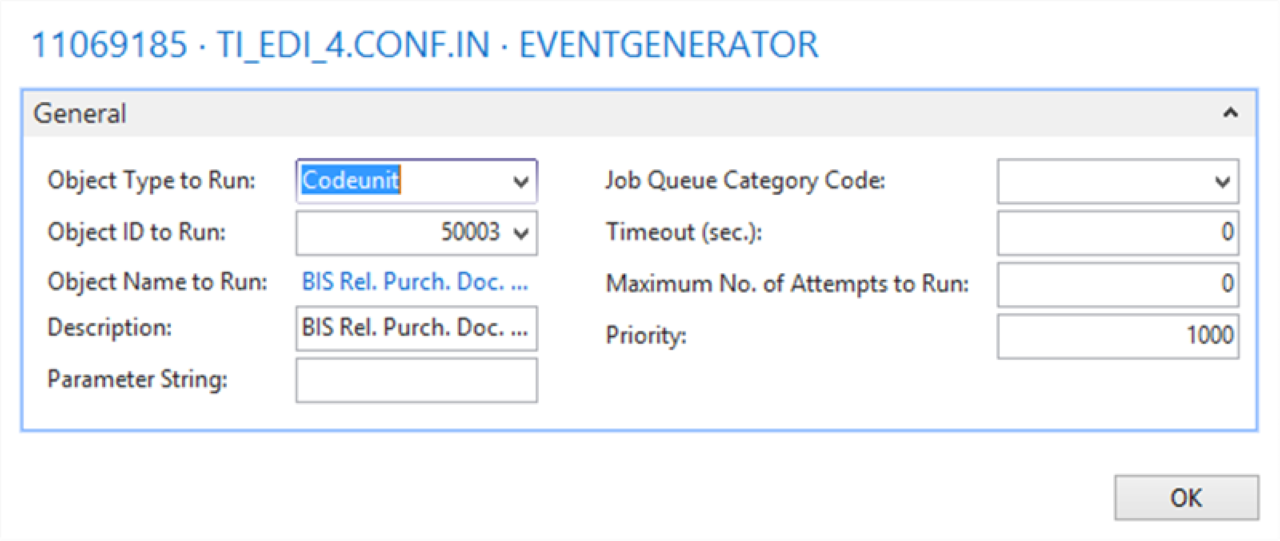
Select Edit on EVENTGENERATOR and specify the required fields.
Process
Process the connection.
If processing succeeds, check Message Entries for results.
Result
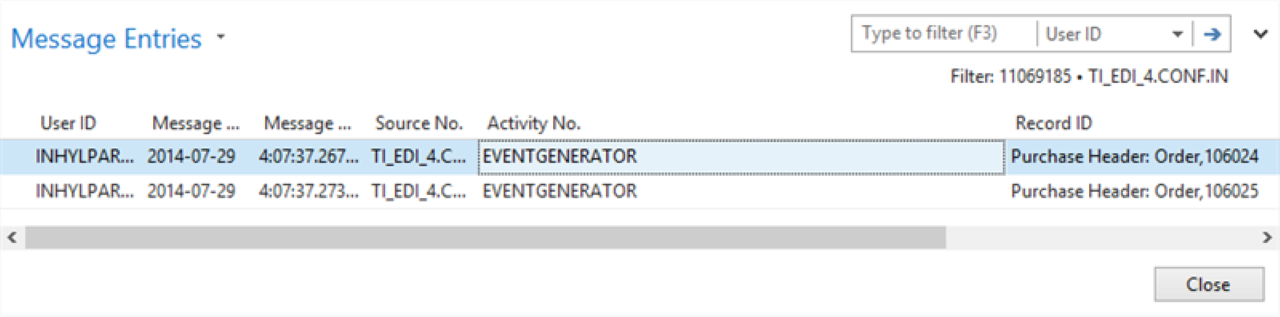
The purchase order updates with the External Document No. field. Use the Transaction Log to see more details for each import.
Shipment export template
Use this connection to export a shipment from CRONUS International Ltd.
Story
This connection uses the following pipeline elements:
After the Sales Manager posts a shipment (selecting Post, then Ship: not Invoice or Ship and Invoice), a posted sales shipment creates for the sales order. The Record Change Event detects this and triggers the pipeline.
The TI_EDI5_SHIP.INT document triggers the pipeline and generates a filtered set of data for the XML Generator and Splitter.

Setup
Select the CRONUS International Ltd. company.
Import the EDI Studio Connection-TI_EDI_5.SHIP.OUT.zip configuration package.
Open the TI_EDI_5.SHIP.OUT connection.
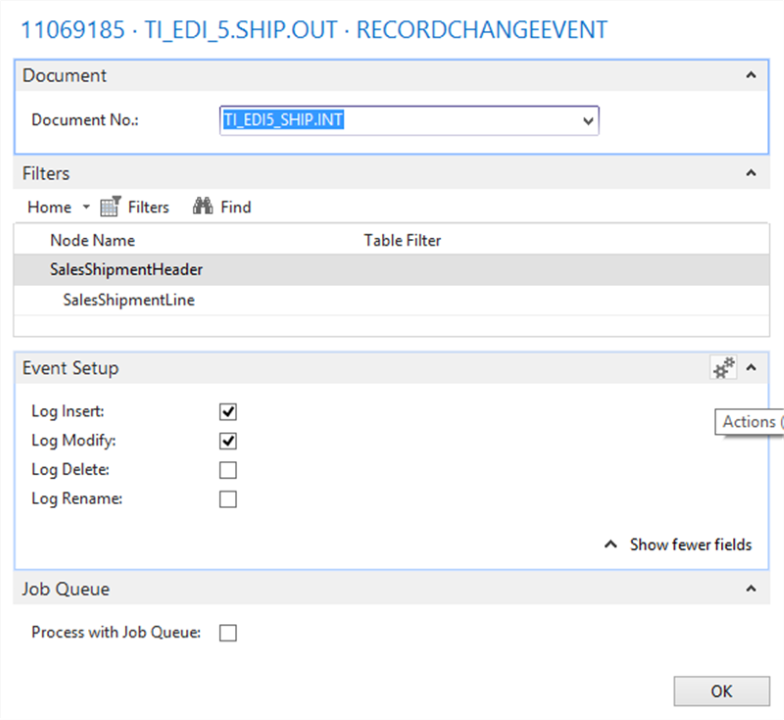
Select Edit on RECORDCHANGEEVENT and specify the required fields.
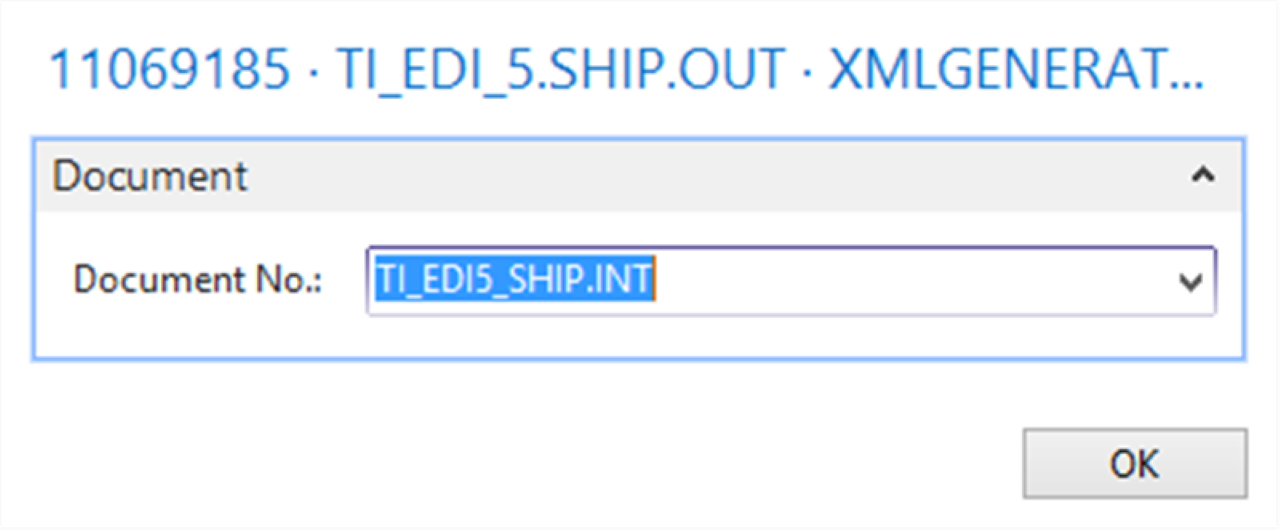
Select Edit on XMLGENERATOR and specify the required fields.
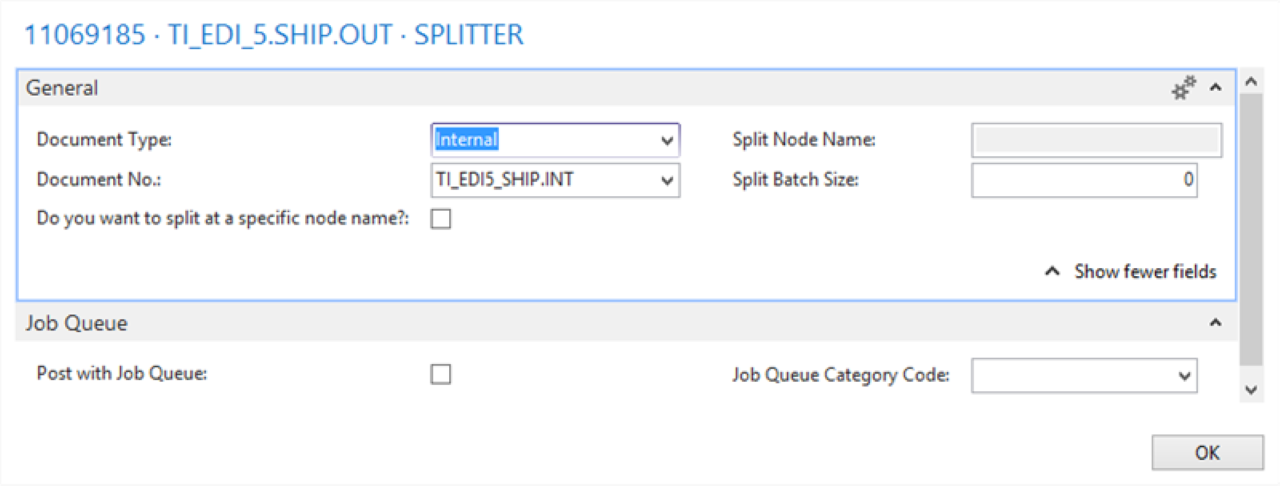
Select Edit on SPLITTER and specify the required fields.
Select Edit on FILEWRITER and specify the required fields.

Refresh or restart the Microsoft Dynamics 365 Business Central client.
Process
Open a released sales order and define the Quantity to Ship field on the sales line.
Post the shipment.
Process the connection.
Result
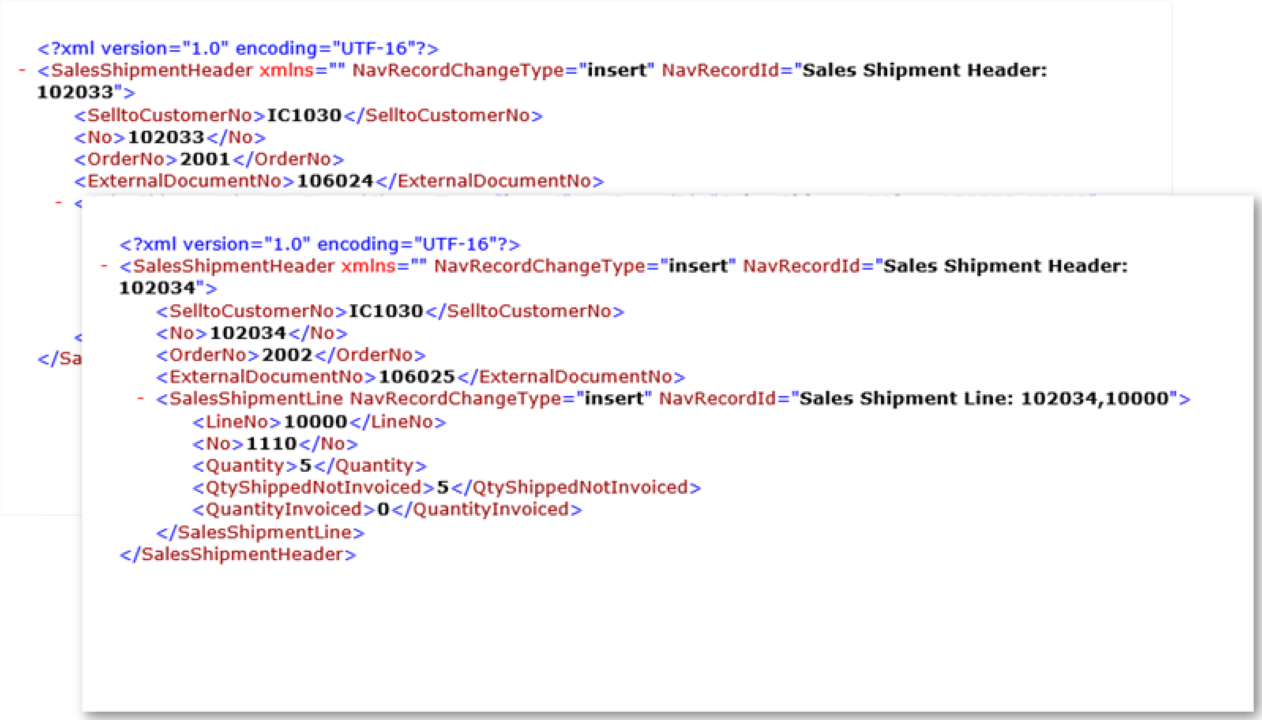
For each shipped sales order, an XML file creates (based on the posted sales shipment) and becomes available at the specified location.
Shipment import template
Use this connection to import a shipment into CRONUS Sales.
Story
This connection uses the following pipeline elements:
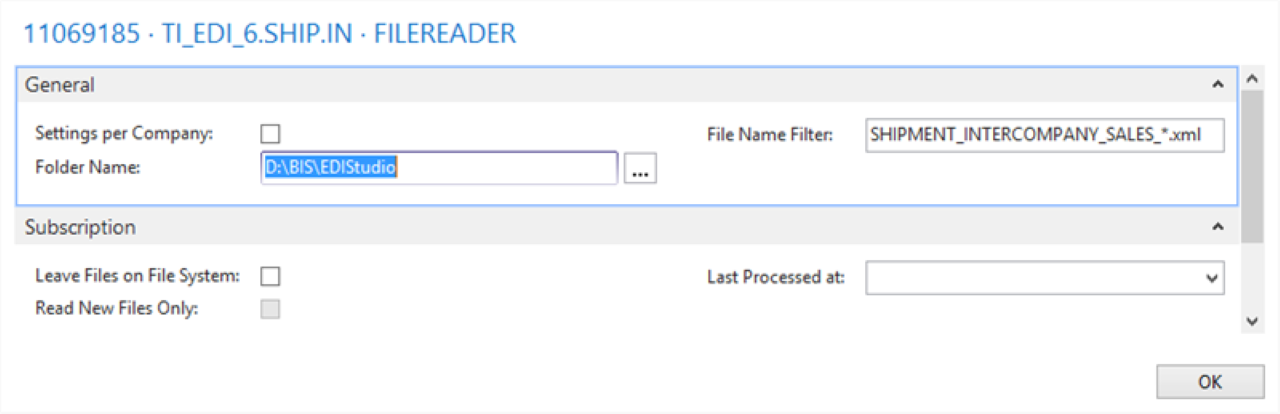
The File Reader endpoint reads the posted sales shipment (in XML format) from the file system.
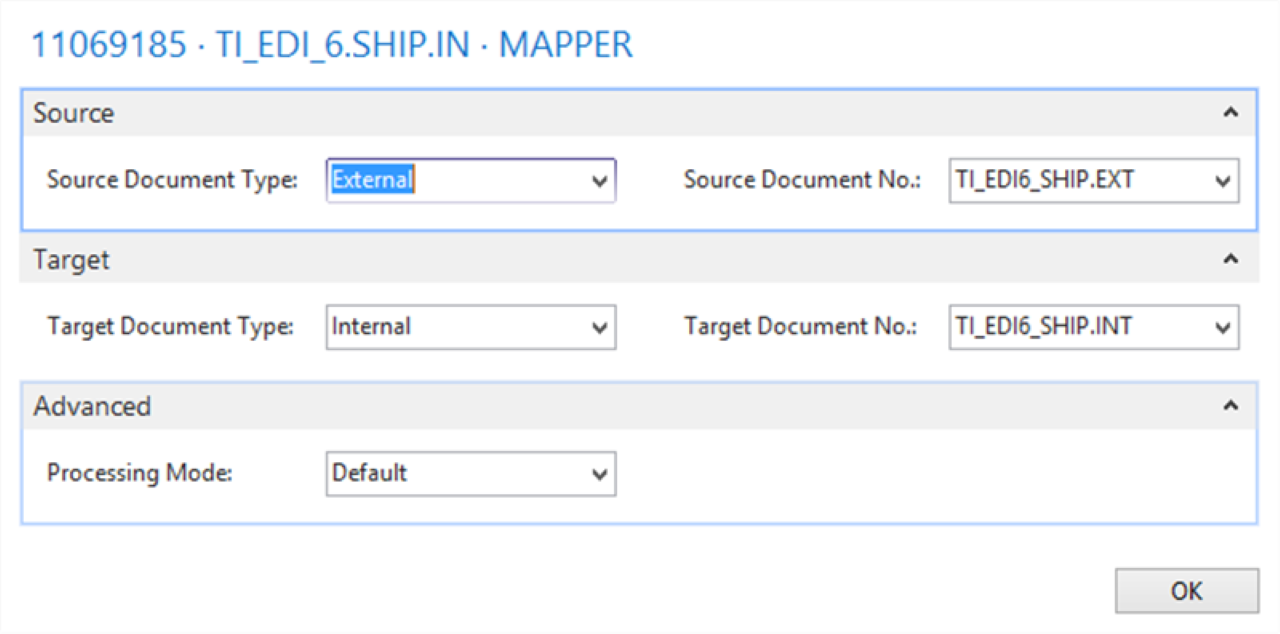
The posted sales shipment does not match the D365 BC table structures for the Purchase Header table, so a Mapper activity maps the external (source) document and the internal (target) document.
The Record Generator activity creates records and updates the D365 BC tables. After importing the posted sales shipment, the Quantity to Receive and the Vendor Shipment No. update in the purchase order.
Two documents support this connection: TI_EDI6_SHIP.EXT (the external document being read) and TI_EDI6_SHIP.INT (the internal D365 BC table structure specifying how the records store).
Setup
Select the CRONUS Sales company.
Import the EDI Studio Connection-TI_EDI_6.SHIP.IN.zip configuration package.
Open the TI_EDI_6.SHIP.IN connection.
Select Edit on FILEREADER and specify the required fields.
Select Edit on MAPPER and specify the required fields.
Select Edit on RECORDGENERATOR and specify the required fields.

Select Edit on EVENTGENERATOR and specify the required fields.

Process
Process the connection.
If processing succeeds, check Message Entries for results.
Result

The purchase order updates with the Quantity to Receive and Vendor Shipment No. fields. Use the Transaction Log to see more details for each import.
Invoice export template
Use this connection to export an invoice from CRONUS International Ltd.
Story
This connection uses the following pipeline elements:
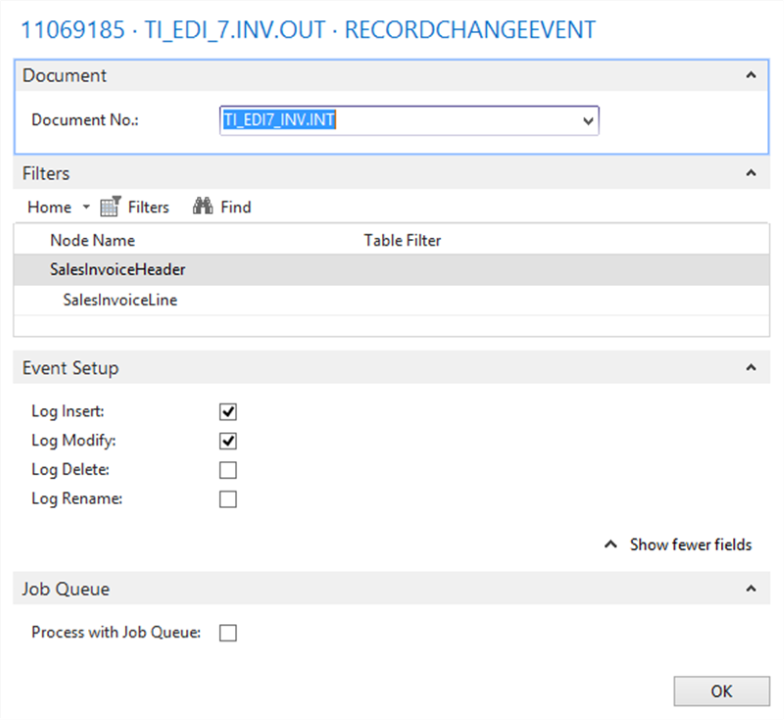
After the Sales Manager posts an invoice, a posted sales invoice creates for the sales order. The Record Change Event detects this and triggers a new export.
The TI_EDI7_INV.INT document triggers the pipeline and generates a filtered set of data for the XML Generator and Splitter.
Setup
Select the CRONUS International Ltd. company.
Import the EDI Studio Connection-TI_EDI_7.INV.OUT.zip configuration package.
Open the TI_EDI_7.INV.OUT connection.
Select Edit on RECORDCHANGEEVENT and specify the required fields.
Select Edit on XMLGENERATOR and specify the required fields.

Select Edit on SPLITTER and specify the required fields.
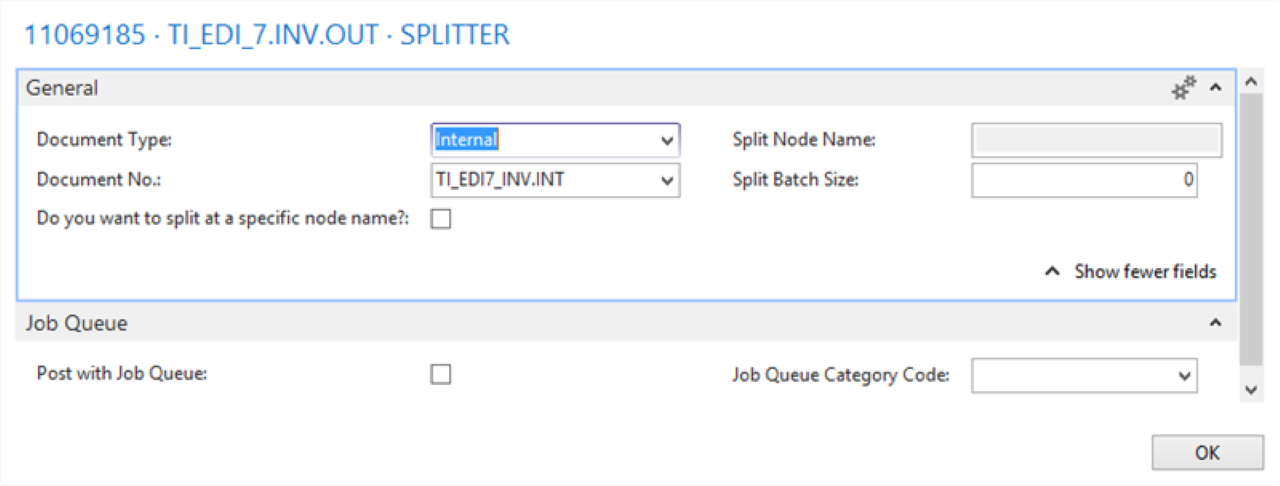
Select Edit on FILEWRITER and specify the required fields.

Refresh or restart the Microsoft Dynamics 365 Business Central client.
Process
Open a released sales order and define the Quantity to Invoice field on the sales line.
Post the invoice.
Process the connection.
Result
For each invoiced sales order, an XML file creates (based on the posted sales invoice) and becomes available at the specified location.
Invoice import template
Use this connection to import an invoice into CRONUS Sales.
Story
This connection uses the following pipeline elements:
The File Reader endpoint reads the posted sales invoice (in XML format) from the file system.
The posted sales invoice does not match the D365 BC table structures for the Purchase Header table, so a Mapper activity maps the external (source) document and the internal (target) document.
The Record Generator activity creates records and updates the D365 BC tables. After importing the posted sales invoice, the Quantity to Invoice and the Vendor Invoice No. update on the purchase order.
Two documents support this connection: TI_EDI8_INV.EXT (the external document being read) and TI_EDI8_INV.INT (the internal D365 BC table structure specifying how the records store).
Setup
Select the CRONUS Sales company.
Import the EDI Studio Connection-TI_EDI_8.INV.IN.zip configuration package.
Open the TI_EDI_8.INV.IN connection.
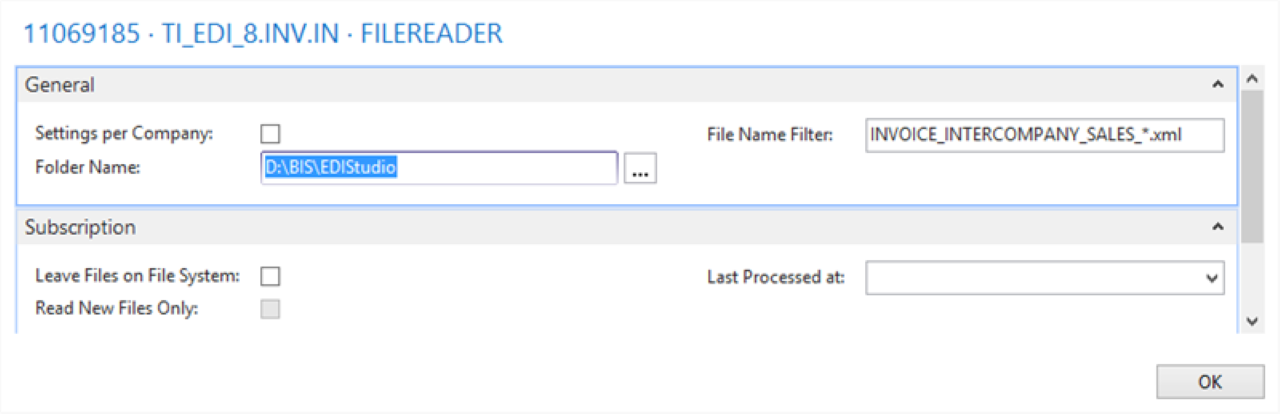
Select Edit on FILEREADER and specify the required fields.
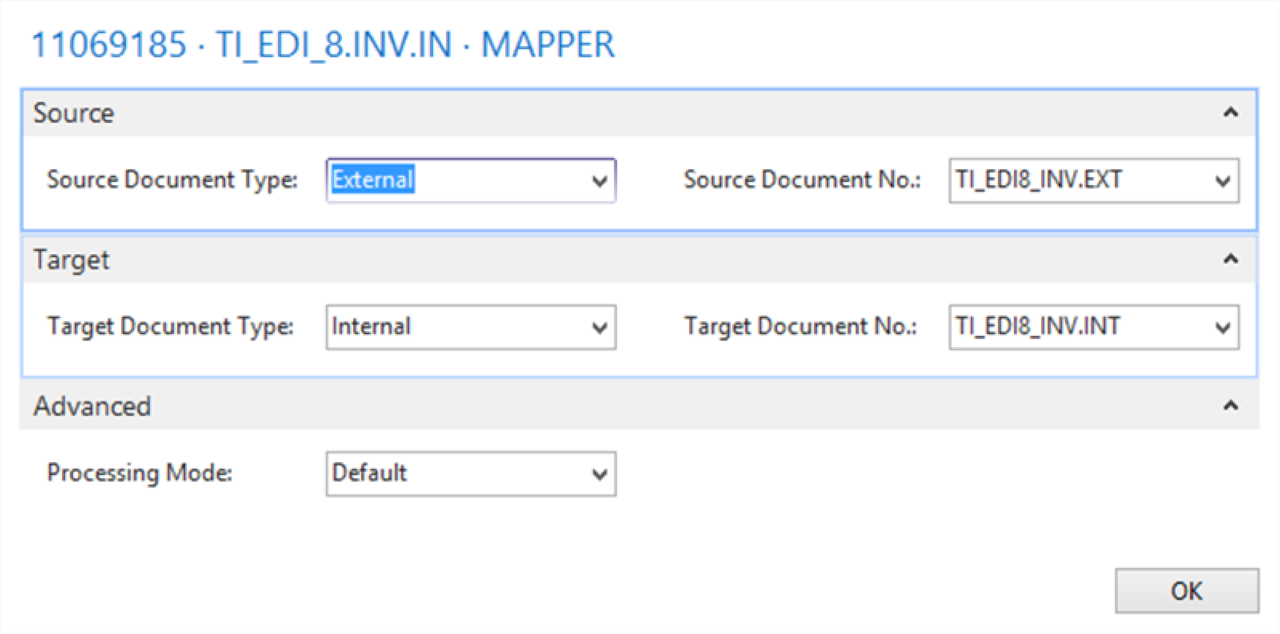
Select Edit on MAPPER and specify the required fields.
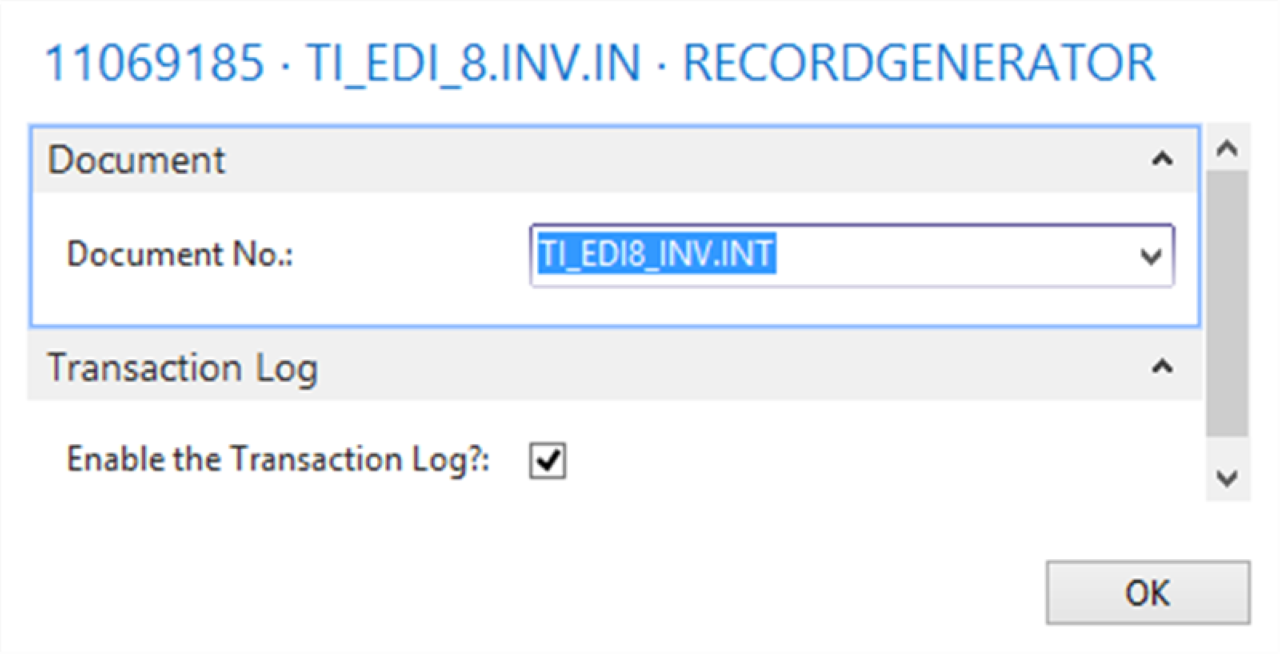
Select Edit on RECORDGENERATOR and specify the required fields.
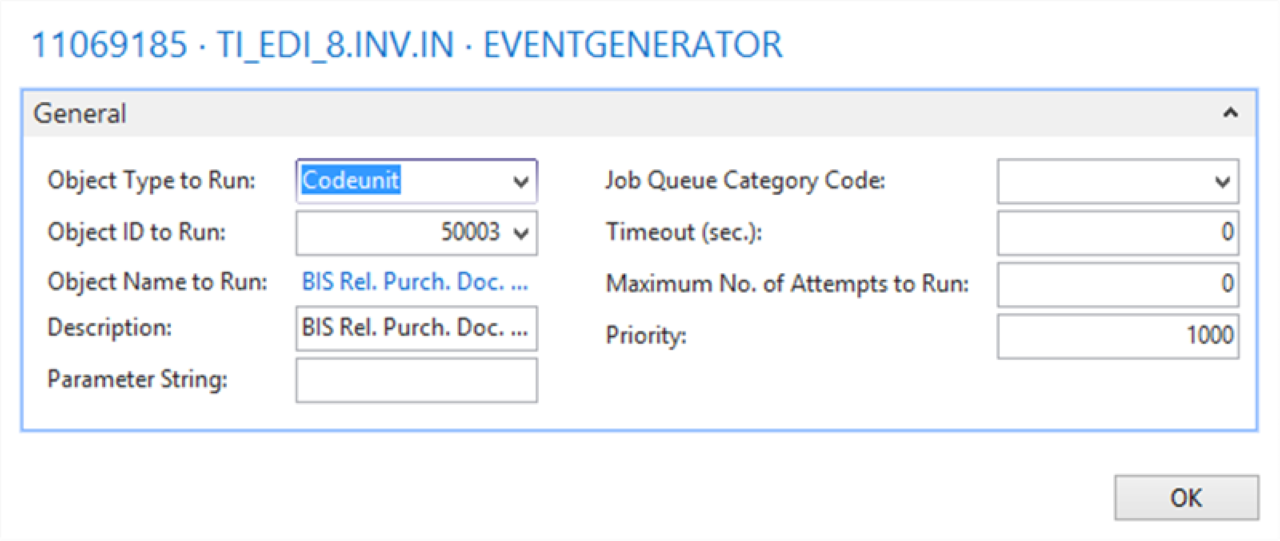
Select Edit on EVENTGENERATOR and specify the required fields.
Process
Process the connection.
If processing succeeds, check Message Entries for results.
Result

The purchase order updates with the Quantity to Invoice and Vendor Invoice No. fields. Use the Transaction Log to see more details for each import.